🚀 VMOS Edge Quick Start
This guide will walk you step by step through configuring the VMOS Edge hardware host. In just five steps, you will be able to control multiple cloud Android systems from your computer as if they were physical phones.
📱 Step 4: Create Your Cloud Phone Instances
Once the image is ready, you can deploy runnable Android environments on the host.
Start creation: In the "Cloud Machine Management" module, click
 in the top menu bar.
Configure details: In the configuration dialog, you can customize:
- Basic environment: Select a ready system image, and set DNS type and machine type (virtual machine or cloud phone).
- Hardware simulation: Simulate specific phone brands and models.
- Region and localization: Configure region, time zone, and language to match your target usage environment.
- Display and performance: Set resolution and frame rate, and enable GMS (Google Mobile Services) if needed.
- Security settings: Upload certificates (formats: .crt, .pem, .cer, .cert, .key, .prop, .xml, etc.) and define a custom certificate name.
- Naming and batch creation: Enter a cloud phone name and specify the number of instances to create.
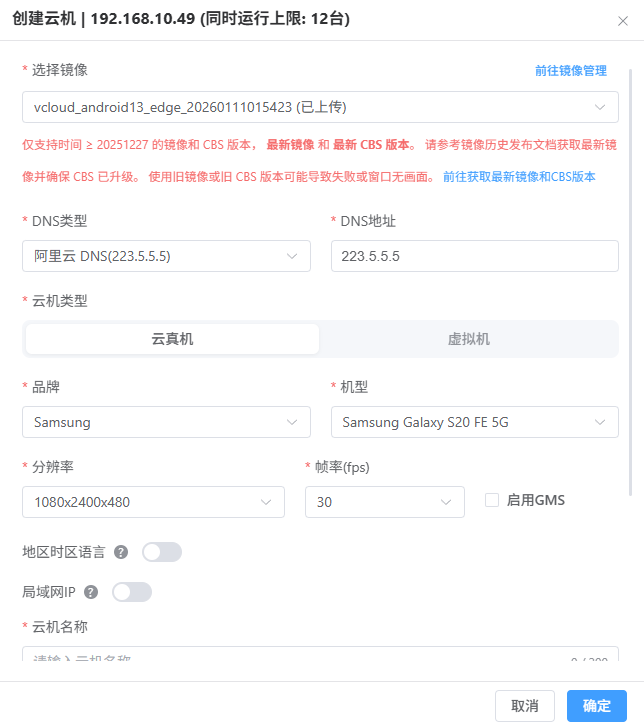
Confirm deployment: Check "Power on automatically after creation" and click [OK] in the bottom-right corner.

View results: The system will display "Operation successful, please check the creation result later." The cloud phone cards will appear in the list.