Usage Flow Guide
This guide is designed to help you quickly master the core functions of the VMOS Edge management console. It follows the logical sequence of “resource management (cloud machines, hosts, images) → environment configuration (proxy)”, covering both daily operations and basic troubleshooting.
Module Overview
Before diving into concrete operations, you can first get a quick view of the four core modules of the system:
Cloud Machine Management: The core operation object of the system, used to manage Android virtual machine instances running on physical hosts. It supports single or clustered lifecycle and application control.
Host Management: Manages VMOS L1 physical hardware devices (the carriers of cloud machines), used to monitor hardware resource load, perform device-level O&M and backend service upgrades.
Image Management: Manages the system templates required for creating cloud machines, which determine the initial Android version and pre-installed environment of cloud machines.
General Settings: The global configuration module of the management console, covering window layout adjustment, rendering mode optimization, path management and troubleshooting tools.
1. Cloud Machine Management
Cloud machines are Android virtual machine instances running on physical hosts.
1.1 Interface Overview
The interface follows the workflow of “select host → select cloud machine instances → execute batch operations” to achieve efficient cluster management.
Left host list area: Used to filter target physical devices.
Middle cloud machine instance area: Displays and allows selecting concrete cloud machine instances.
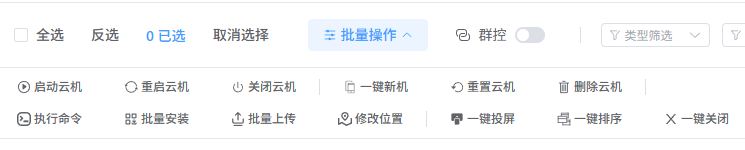
Top batch operation panel: Centralized panel for dispatching management commands.
1.2 Group Control (Core Synchronization)
The group control feature allows you to synchronize operations across multiple cloud machine instances in real time.
- Real-time synchronization: After enabling group control, your clicks, swipes, text input and other actions in the master window will be synchronized to all selected follower cloud machines.
- Operation demo video:
1.3 Batch Operation Guide
Through the top operation panel, you can efficiently execute the following commands on multiple selected cloud machines:
1. Lifecycle Control
- Start / Restart / Shutdown: Control the running state of selected instances in batch. After shutdown, CPU/RAM resources are released but data still occupies storage.
2. Environment and Configuration Management
- One-Click New Machine: Reset device fingerprints (such as IMEI, Android ID) for selected instances, used for environment refreshing or risk control scenarios.
- Reset Cloud Machine: Restore selected instances to the initial image state. This operation will permanently erase all user data in the Data partition.
3. Application and File Deployment
- Batch Install: Install specified applications on all selected instances.
- Batch Upload: Upload files simultaneously to specified directories on all selected instances.
4. Display and View Operations
- One-Click Screen Mirroring: Open mirrored screens for selected instances to enable centralized monitoring.
- One-Click Sort: Re-arrange instance windows according to a predefined rule.
- One-Click Close: Quickly close opened mirroring windows.
5. Other Batch Commands
- Execute Command: Send unified ADB commands to all selected instances.
- Delete Cloud Machines: Destroy selected instances in batch to free resources.
3. Image Management
Images are the system templates used to create cloud machines and determine the initial Android version and pre-installed environment.
Import Images: Supports importing new images that meet specific file format and path requirements.
Replace Images: Select or replace images for cloud machines; note that cross-major-version switches may involve data clearing.
Maintenance: Supports deleting unused images to save space.
4. Settings
This module is used to configure global parameters of the management console and optimize the operation experience and system compatibility.
4.1 Window and Interaction Settings
- Main window size: Adjust the PC client interface size, providing compact (1250×800), standard (1440×900) and widescreen (1920×1080) modes. Changes take effect after restarting the client.
- Cloud machine window size: Set the initial side length of mirroring windows (300–2000px). The picture scales proportionally and changes take effect on the next connection.
- Interaction options: Adjust mouse wheel sensitivity (0.001–800) and optionally enable Android hover interaction effects.
4.2 Video and Rendering Configuration
- Rendering mode optimization: When integrated graphics or incompatible drivers cause display issues, you can check “Disable hardware acceleration” to use CPU rendering. This improves stability but may limit frame rate, and changes require a restart to take effect.
4.3 File Management and Maintenance
- Screenshot configuration: Customize the local storage directory for screenshots and support one-click “Change” path or “Open” to jump to the target folder.
- Export logs: Export a log package of the management console with one click. The log contains underlying runtime data and is a key basis for troubleshooting and technical support.
Summary
Through the above four modules, users can achieve a complete closed-loop control from underlying hardware (hosts) and system environment (images) to top-level business (cloud machines), and further improve management efficiency via the Settings module.