VMOS Edge AI Workflow In-depth Operation Guide
1. System Initialization: Configure AI Inference Engine
Before starting automation tasks, you need to connect AI capabilities to the system so it can understand instructions and break down steps.
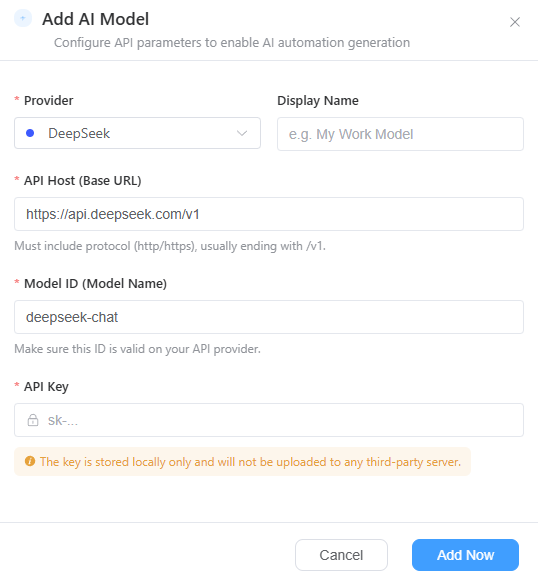
- Access Model: Click
 to enter the "Model Configuration Management" interface, then click
  .
. - Core Parameter Configuration:
- Model Provider: Select the corresponding service provider (e.g., DeepSeek).
- Interface Information: Fill in the API Host (Base URL) (must include protocol header and version path) and Model ID (ensure it matches the version provided by the service provider).
- Security Credentials: Enter your API Key. The system uses a local encrypted storage solution; the key is only saved on your current device.
- Activation Confirmation: After adding, ensure the "Currently Selected" status is checked in the model list.
2. Device Association: Select Execution Terminal
AI needs to execute tasks in a specific hardware environment; you need to clearly specify the target cloud machine.
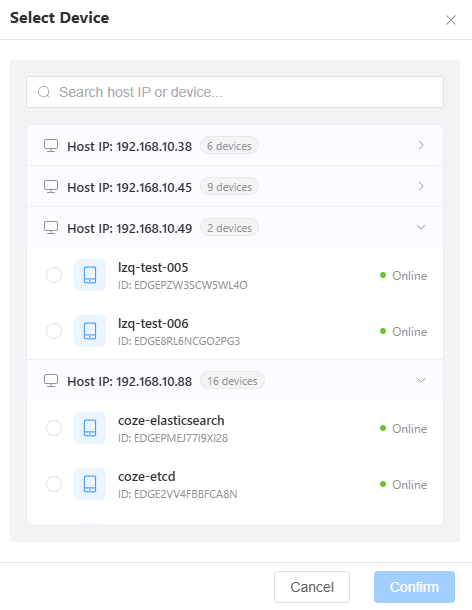
- Device Retrieval: In the "Select Cloud Machine" window, you can quickly search by host name or IP address.
- Status Verification: Ensure the target device is in the "Online" status.
- Screen Synchronization: Once selected, the physical screen of the cloud machine will be mapped in real-time on the right side of the main interface, serving as your monitor for observing AI execution actions.
3. Instruction Interaction: Intent Recognition and Task Execution
This is the core process of converting "language" into "actions."
Issue Instruction: Describe your task in the workflow dialog.
- Example: "Open Xiaohongshu, click the publish button, select the second image from the album, and automatically add theme text about technology."
Instruction Optimization: After inputting, it is recommended to click Smart Optimization
 . AI will structurally refine your spoken language based on automation logic to improve the execution success rate.
Observe Execution Logic:
- Thinking Process (Thinking): View in real-time how the AI understands the task and plans the path.
- Action Feedback (Tool Call): Monitor the specific underlying actions called by the AI, such as: observe screen, click node, set wait, etc.
- Real-time Feedback: Observe if the cloud machine screen on the right stays synchronized with the steps described by the AI.
4. Script Accumulation: Conversion from Dialogue to Automation Logic
Please note: After the AI simulation operation ends, the task is not formally saved. You need to convert it into a reusable script through the following process.
- Generate Logic Flow: After the task is executed and meets expectations, click the [Generate Script] button.

- Script Arrangement Preview: The system will automatically generate a structured list of steps in the middle area.
- Step-by-step Breakdown: Each major step (e.g., "Enter publishing page") will contain specific sub-actions.
- Automatic Recognition: AI will automatically recognize and record the underlying ID (node information) of each button instead of just recording click coordinates, ensuring script stability.
- Debugging and Verification: You can debug directly on the current interface before formal saving.
- [Run]: Click the Run button at the bottom; the system will execute the generated steps once on the cloud machine to verify script accuracy.
- [Stop]: If you need to interrupt during execution, you can click Stop at any time.
- Manual Save: This step is crucial. You must click the [Save]
 button at the bottom for the process to be stored in your script asset library.
 - Asset View: Click the [Script Library] button in the upper right corner to quickly switch to the saved script list interface.
5. Script Asset Management: Post-optimization and Maintenance
In the "Script Library," you can perform fine-grained management of generated automation assets.
- Rename and Categorize: Set clear names for automation processes for different purposes.
- Action Flow Fine-tuning: Click [Expand Edit], and you can manually fine-tune execution parameters under each action node (such as coordinates, swipe offset, wait time, etc.) to achieve more precise control.
- Node Verification Tag: This is a core feature to ensure the long-term usability of scripts. [Verification] serves as a functional tag; checking it means the AI will verify this node.
- If the page layout changes (e.g., App update), the system will compare the element path in the script with the current cloud machine screen through the verification function to quickly locate failed steps.
- Persistence Synchronization: All modifications must click [Save Changes] to officially take effect.
6. Large-scale Deployment: Batch Execution on Cloud Machines
After saving the script, you can go to the "Cloud Machine" management page for large-scale deployment to quickly apply the automation flow to multiple devices.
- Enter Cloud Machine Management: Switch to the [Cloud Machine] tab at the top.
- Enable Group Control: In the device list, check multiple target devices and switch on the [Group Control] toggle.
- Batch Execute Script: In the batch operation toolbar at the bottom, click the [Execute Script] button.
- Select Script: Choose the AI script you just generated and saved in the popup, then click OK. All selected cloud machines will start executing the task synchronously.
- Task Monitoring: You can click [Stop Script] at any time to interrupt the batch running status of all devices.

7. INS SOP
Example:
Example 2:
💡 Core Usage Suggestions
- Feedback Correction: If the AI deviates during execution, you can "correct" it directly in the dialog box (e.g., "Clicked wrong just now, should have clicked return in the top left corner"), and the AI will correct the action.
- Environment Consistency: When performing script verification, ensure the cloud machine is on the initial interface corresponding to the script operation for accurate matching results.